The Shaving Cadre
You are using an out of date browser. It may not display this or other websites correctly.
You should upgrade or use an alternative browser.
You should upgrade or use an alternative browser.
Shawn's forging shed
- Thread starter ShawnF
- Start date
Sort of. It's called cu mai. It is like a go mai that uses 5 layers forge welded together to show lines when ground and etched. This replaces 2 of the steel layers with copper so some of your lines are the copper showing.Damascus?
How do you keep the copper layers out of the cutting edge? Is this folded around a high carbon steel? Very interesting!Sort of. It's called cu mai. It is like a go mai that uses 5 layers forge welded together to show lines when ground and etched. This replaces 2 of the steel layers with copper so some of your lines are the copper showing.
The layers just sit on top of each other and there is no folding. The trick with it and san mai (3 layers) is to just flatten it. No folding. That keeps your core in the center and you grind the bevels in. The lines come from where they stop as you grind them away getting to your edge.How do you keep the copper layers out of the cutting edge? Is this folded around a high carbon steel? Very interesting!
Neat, I learned something today! Thanks Shawn, looking forward to seeing it, if it turns out!The layers just sit on top of each other and there is no folding. The trick with it and san mai (3 layers) is to just flatten it. No folding. That keeps your core in the center and you grind the bevels in. The lines come from where they stop as you grind them away getting to your edge.
Best wishes!
Heat is an important factor in this. You only need it hot enough for the copper to stick, not full forge welding temperature for the steel.I always thought copper would melt before the steel was hot enough for the weld to take. Can wait to hear how this turns out cause that should look awesome!
So I was going to try and get that in the forge tonight, but spent all evening trying to tear apart stuff to figure out why my toilet wasn't flushing. Not to mention the nearest parts store is a 30 minute drive....
But here is the billet stacked, and then welded. The entire outside needs to be enclosed so you don't "leak" any of the copper out.
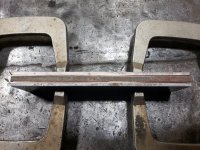
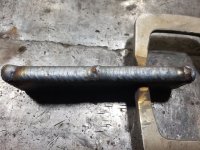
But here is the billet stacked, and then welded. The entire outside needs to be enclosed so you don't "leak" any of the copper out.


woodpusher
TSC’s International Man of Meh
Well..... The cu-mai didn't work out..... So let's get back to our regularly scheduled programming.
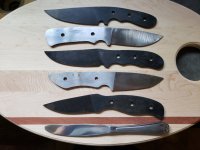
The 2 that are more refined had already been heat treated. There were 3, but one was giving me a fit with warping in the quench. I knew better but ended up quenching it multiple times and it cracked on me. Of course, that was the one of the 3 that was actually an order, so back to the forge I go...
Since I had it lit and actually had the time, I hammered out the replacement and 2 more. They just got tempered last night and I haven't gotten out to clean them up yet.
I got a set of hardness files and the 65hrc file will put a divot in them, but the 60hrc file will not. All of them are 1095, and the butter knife is just there for size reference.
The top one is the order replacement that I broke, and the one right below it was purchased the other day.
One of the others is going to the conservation club where I used to do my pistol shoots. When I signed up for membership, the president asked me what kind of shooting I did. I told him I did defensive pistol competitions and he immediately said they needed to do that. He asked me to come to the next meeting and at the meeting asked me what I needed to get them started, gave me keys to the place, and a check for supplies. I ran them up until I had to go for my hip surgery. So I'm donating one for them to raffle as a fundraiser.
Another one of them is going to the high school trap team to use as a fundraiser. I was so shocked to hear that the school was actually going to allow the kids to get into a firearms sport I signed up as one of the first coaches to give them enough people to be able to get it started. They have been doing good for about 6 years now and have had a few kids make it to nationals.
No idea what I'm going to do with the last one yet, but I'm sure it will find a home.

Great stuff man!
Those look great Shawn.. And of course you know JJay loves them all ( butter knife excluded of course ).. And Jjay is still trying to figure out how to do a home made forge so he can try his hand at making stuff...... On a side note , do you still have a picture of the straight razor you sharpened for me that john sent you?
They are slightly recurved. I like the look but wanted to make sure to keep the tip in line with the grip so I made sure not to get carried away with it.The first and third knives give the impression (and I can't tell if it's really there or not) of a slightly swept back, or recurved spine. I really like the profile on those two.
Damn those are nice!
My son shoots trap on the HS team. I think this is the third year they've had it. He placed 3rd at the State Tournament in the Spring.. I was so shocked to hear that the school was actually going to allow the kids to get into a firearms sport I signed up as one of the first coaches to give them enough people to be able to get it started. They have been doing good for about 6 years now and have had a few kids make it to nationals.
That is awesome! I have to admit that I have only ever shot one round of trap in my life, but they needed numbers for the coach trainer to come, and for coaches to get started. I have always tried my best to help new shooters and encourage any of the shooting sports, so I signed up to become a coach.My son shoots trap on the HS team. I think this is the third year they've had it. He placed 3rd at the State Tournament in the Spring.
I can't find any photos of the razor.Those look great Shawn.. And of course you know JJay loves them all ( butter knife excluded of course ).. And Jjay is still trying to figure out how to do a home made forge so he can try his hand at making stuff...... On a side note , do you still have a picture of the straight razor you sharpened for me that john sent you?
As far as doing a home made forge, a box of dirt is the cheapest and easiest route to get started. Make a 2 foot by 2 foot box out of 2x4s and put a bottom in it. Fill it with a good packing dirt, clay is great if you have a spot to dig down far enough for it.
Get 2 cheap fire bricks from the hardware store and stand them on their side to make a little wall slightly off center of the box.
Take a piece of pipe and run it just through the brick in the middle of the "wall" at the bottom by the dirt on the short side. If you have a masonry blade of some sort you can cut the corners off, or very delicately chip them off with a hammer and chisel just enough to let air from the pipe blow through.
Get an old hair dryer (you don't need heat, just the fan) and attach it to the other end of the pipe.
Now you have what is called a side blast forge. Make or buy some lump charcoal (not the briquettes) and pile it on the opposite side of the wall from your pipe. Light it, turn on some air, and you can now heat some steel.
You could use coal in the same way, but you have to turn it into coke or the sulfur will contaminate your steel. Basically you start your fire and wait. You will see the smoke turn from a greenish yellow to white. Then you should be ready. The coal near your hot spot will start to turn to coke as you are forging so you can keep pulling everything in as you work. Burn out the coke and pull more in, then replace that with new coal to start turning to coke.
That said, charcoal is cleaner and requires a little less tending. Just depends on what is more available to you.
Good first projects would be some tongs for holding work, and a puller for tending the fire. Both can be made from 3/8 or 1/2 inch mild steel rod you can find at many hardware stores.
A 24 oz ball peen, 3 pound cross peen, 2 pound drilling hammer.... or whatever you can find that he can swing comfortably will work. Anvil can be as simple as a 10 pound sledgehammer head stuck into a stump and use one of the faces.
There are quite a few places online that can show you pictures of the forge setup. Just search for JABOD or sideblast forge.
