The Shaving Cadre

Welcome to The Shaving Cadre, a forum dedicated to gentlemanly discourse about wet shaving and other topics of common interests. Membership is always free so register today and join in the fun

Shawn's forging shed

Yes and no...... I have more coordination in my left, but more strength in my right. I eat and write left handed, but throw a ball or something like that right handed.
Cool! Ambidextrous, to a degree, the best of both worlds. I'm fairly amby, it is a real help as a welder to be able to go lefty when the work calls for it.
 
Cool! Ambidextrous, to a degree, the best of both worlds. I'm fairly amby, it is a real help as a welder to be able to go lefty when the work calls for it.
Most definitely helps. especially hanging off the side of a building or under a pipe rack haha. Mig and stick I can do pretty easily either hand. Walking the cup with a tig offhanded takes a good bit of concentration still.
I try to practice shooting both hands although I'm primarily right handed. Funny thing is I shoot rifles right handed, right eye dominant. But my pistols I shoot right handed, left eye dominant. I can squint either eye, but the right (leaving left eye open) is a bit easier,
 
Did you make the cutting board too?
Sorry I missed this Dave. I didn't mean to not answer you. I didn't make the board, but I do fix the machines that made it if that counts for anything.
It was a second from work, so I brought it home, cut the corners to be round, routed the edges, sanded the face, and put the finish on it. I did some work on it, but tI didn't cut the pieces or glue them.
 
Guy has some skills with a 4 inch grinder for sure, but not the best anvil. I started with a track anvil, and found out the hard way that they aren't great when made like that.

The web of the rail is too thin and you lose your mass under your work. You end up doing a lot of extra hammering for minimal gain in material movement.
If he would have cut some of the bottom away for knuckle clearance and turned it on end, it would have worked much better as a sort of a post anvil. That would have kept more mass under the work.

I've found that a lot of people fall for the idea that you need something that looks like a "london pattern" anvil. I fell for it too in the beginning. After gaining a little experience now, I'd be happy with just a sawyer's anvil. It it basically just a big block of steel with a hard face and a hardy hole, but you have all your mass under where you are working.
If you look at a blacksmith using what most people consider a "traditional" anvil, unless he/she is using the horn or hardy he/she is working over the waist of the anvil because that is where the most mass is.

Must be the day for "instructional" videos. I saw one earlier where a guy was showing the "proper" way to build a forge. Wrong brick, wrong burner placement, and completely wrong use of it. He basically had a torch in a box and was using the direct flame to heat the steel while losing a lot of heat being sucked up by a brick that by design conducts heat instead of insulating and retaining it. Again, I did that very same thing in the beginning thinking I knew how to do it because I had watched a few of these videos.
Luckily for me though, I had someone that is a most excellent razor maker and also patient and willing to help an idiot to steer me straight after I got done playing and decided to get serious.
I really kind of despise these types of videos anymore because of all the misinformation spread by them just for a few more views. There are definitely guys out there that do know what they are doing and post good videos, but unfortunately not as many as the ones with the easy way out videos. Not everyone has someone like @bluesman to call on to straighten them out when they are being a complete idiot.
I thought of you because I remember reading you posts about "anvil shaped objects" verses what is most effective. It is great to have a place here with real experts!!
 
I'd be happy with just a sawyer's anvil.

I used to think that too until I read they are really hard and chip easy on the edges. I use my horn too much and would really miss it. What people don't know (but we do) is that the London Pattern is a "new" anvil so to speak. Anvils before that were blocks of steel hammered into wooden bases or they looked a lot like that sawyer's anvil you'd like to have.
 
I used to think that too until I read they are really hard and chip easy on the edges. I use my horn too much and would really miss it. What people don't know (but we do) is that the London Pattern is a "new" anvil so to speak. Anvils before that were blocks of steel hammered into wooden bases or they looked a lot like that sawyer's anvil you'd like to have.
For what I'm mostly doing when I actually get out there, I like the idea of the bigger surface. I know I'm only going to use what's directly under the hammer, but I like the idea of having it for flattening. As far as the horn, for the little I do with mine, I honestly think I could get away with just using some custom hardy tools.
Although, a good size German pattern would be a good compromise. They tend to have a larger face, larger waist, yet still have a horn. Plus you can actually find them for less than a new mortgage.
 
Although, a good size German pattern would be a good compromise.

Oh yeah, a German style anvil with the square horn heal......yeah, that's the dream of every blacksmith. They knew how to put the mass where it belonged! I think a bladesmith would get by just great with something like that. Got out to do some forging last week. My post vise needed a proper key to it - dang nice to forge one to spec's and just hammer it in after cooling. Problem solved.
 
I did a bunch of shop maintenance yesterday as well as forging out a pattern welded razor blank. New wooden mallet head, new handle on my 4 lb rounding hammer,dressed several hammers, made one of those rocking angle iron things for holding non parallel sides in the vice.
 
Actually finally have a bit of a shop update!!!

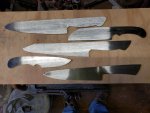
After a bit of forging and a bit of grinding I have a few blades ready to be drilled and get the rough bevels ground in so they can be heat treated.
The sheepsfoot blade is 80CRV2, and will have red santos mahogany scales. It is a version of a sailors knife I'm making for @ShaveMD
The others are all 1095 steel and I have no idea what is going on for scales yet. One of the kitchen knives has a definite home and will be black walnut, I just haven't decided which blade it will be yet. Not sure what's going to happen to the rest at this point, they are misfits currently.
Still have a large slicer to sketch out and get made as well as another poker, but I'm sort of slowly maybe kinda not really getting caught up....

20200518_183209.jpg
 
Nice job Shawn. Such good forging it almost looks like you did pure stock removal. Warm weather really helps though doesn't it!
 
Nice job Shawn. Such good forging it almost looks like you did pure stock removal. Warm weather really helps though doesn't it!
There was definitely bit of time on the ceramic belts to get them cleaned up like that........ Went through two 36 grits and a 50 grit to get them to that point.
 
Looks wonderful Shawn. I am really looking forward to mine. I opened up the boat this weekend so it will definitely come in Handy. Thank You again I feel very fortunate to get such a quality handmade item
 
Looks wonderful Shawn. I am really looking forward to mine. I opened up the boat this weekend so it will definitely come in Handy. Thank You again I feel very fortunate to get such a quality handmade item

Shawn's the guy you want making that blade for you. I've not known anyone who's been unhappy with the looks or performance of Shawn's knives.
 
Great looking beginnings Shawn! I am sure they will be awesome. Can't wait to see what they look like when finished.
 
Went through two 36 grits and a 50 grit to get them to that point.
That's a lot of belt wear.

I have taken to descaling with vinegar or sometimes with a 7" angle grinder before going to the belt grinder. That scale can be hard on belts.
 
Back
Top