The Shaving Cadre

Welcome to The Shaving Cadre, a forum dedicated to gentlemanly discourse about wet shaving and other topics of common interests. Membership is always free so register today and join in the fun

An Unexpected Journey: A Newbie's Walk In Wet Shaving

As your Minister of Manliness I've not been very faithful to regular postings lately, but I hope to provide a good shot of testosterone.
First, let's talk shaving. I use a Parker variant, so I can adjust the aggressiveness. I mixed it up at the end of my Feather blades life & discovered that for me any irritation is directly resultant from that first pass. So I shifted the setting down to 3 for the first pass then back up to my normal setting of 4 for my last 2 passes. Usually I get so-so shaves at the end of my blades life, but doing this shift down on the first pass, no chance of irritation.

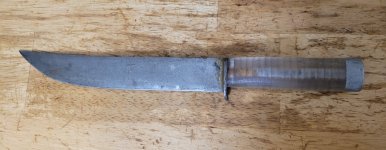
Ok, now on to man stuff. I finished my first knife that was forged from a coil spring out of a car. Nothing special, but it will slice paper effortlessly. My wife has been enjoying using it in the kitchen. The handle is made from curly oak I had hanging around.

20231230_163444.jpg
20231230_163536.jpg
I got to try it out the other day on a ham we smoked, and man it was just melting right through it effortlessly. It felt great to use something I completely made from raw materials. From forging the blade to mounting the handle materials.
20240203_175810.jpg
This first knife was a learning tool and I have to thank @ShawnF for all his wisdom & advice.
 
Now that I am working in law enforcement, I found that ordering off the shelf stuff for my duty belt just didn't cut it. I had a multi-tool I wanted to carry but there was nothing off the shelf to fit it. So off I dove into the world of leatherworking.

The only requirements by my employer us that duty belt accessories must be black and of the basket weave pattern. So, I got to work on a pancake style holder.
20231111_190906.jpg
I've never attempted anything like this before, but I read up on it. There's actually a stamp that creates the basket weave pattern pretty easily. You first have to wet the surface if the leather, let the color get back to normal, then you start your pattern. I used my forge stamp since I do not have a leatherworking one.
20231115_200215.jpg
Here's the final holder all sewed up with saddle stitching and with a coat of leather wax. Most thought I bought it. I was happy with it for a first try.
 
So now my favorite flash light needed a proper holder. Again, nothing off the shelf fit it and I really like the small lights vs. The larger ones. Well this is more advanced leatherworking because I'd have to wet form the leather to the flashlight. I've never done this before either. First step is making the back piece with slots for the duty belt and stamping out the front basket weave piece.
20231121_142055.jpg
Now it's time to let the patterned piece soak & form it to the light. I wrapped the light in kitchen saran wrap first.
20231121_145028.jpg
The molding process is all by hand every 20 minutes until the leather dries. There are other molding methods, but this one seems to work best. Once dry, I glued & clamped it to the back piece.

20231122_155537.jpg
Once dried I trimmed everything up to a finished raw holder.
20231122_182000.jpg
After sewing & dying + a coat of wax
20231125_114900.jpg
20231125_114923.jpg
I was happy with it. I really like the ability to customize my duty belt to the tools I prefer to use on the job. All of this is a warm up to tackle making gun holsters.
 
Many here know I like collecting old knives. Just this year I discovered a pretty neat historical knife category. They call them theatre knives. These knives were made in the theatre if war mostly in WWI & WWII. A lost of the Seabees on the ships had access to scrap materials & made these knives to sell or trade for battlefield souvenirs.

This one was my first acquisition. It's handle is made from a 50 cal casing with a headstamp dating 1945. The blade feels like it was part of a Japanese sword or possibly some other enemy blade. Given the patina pattern on the shell, the GI was a lefty!
20240119_170042.jpg
This would be the smallest blade I bought!

Next up is the grizzly slayer. This knife is a beast. This one had an inscription but no date. Based on my research, the maker was a WWI vet working on the Alaskan highway during WWII & made this knife & sheath for someone shipping off to war. Once I sharpened it, this knife was darn scary sharp.
20240120_125625.jpg
20240120_125658.jpg
20240120_125723.jpg
The last one is probably my favorite. The handle stacked pieces are made from crashed or damaged WWII cockpit windshields. They were made out of highly durable plastics ^ were a common scrap material available. I'm guessing the blade is made from an industrial bandsaw blade or something along those lines. Wish this blade could tell its story

20240123_164511.jpg


20240123_164457.jpg
20240123_165224.jpg
These knives really showcase American ingenuity at its best. Many of the WWII GI's weren't issued great knives or their leather stacked handles deteriorated quickly in the salt water so they had to come up with something usable with scrap materials
 

Attachments

  • 20240123_164447.jpg
    20240123_164447.jpg
    98.9 KB · Views: 3
Amazing leather work! I have definitely seen a lot worse on the retail market and customized leather will last a lifetime. Be careful though...you might find yourself with a lot of orders for your handy work by your co-workers if you are not careful!

Those knives are definitely tell a story and those stories are in good hands with you!
 
I've had a bit of a rough start after moving as far as getting my hobbies back in the mix.

Went out metal detecting a few months ago to an old building & found these WWI service buttons all in about a 6 ft radius. The building was built in the 1800's but has been gutted so there is so much trash right around it that you have to get out around the property to find things.
20231122_170151.jpg
20231122_170249.jpg
A lot of detail cleaning had to be done to get them looking decent. Below is one clean & one not yet cleaned.
20231122_140446.jpg
20231122_140202.jpg
 
I've had a bit of a rough start after moving as far as getting my hobbies back in the mix.

Went out metal detecting a few months ago to an old building & found these WWI service buttons all in about a 6 ft radius. The building was built in the 1800's but has been gutted so there is so much trash right around it that you have to get out around the property to find things.

A lot of detail cleaning had to be done to get them looking decent. Below is one clean & one not yet cleaned.

Amazing work. I love early military artifacts.
 
Back
Top