The Shaving Cadre
You are using an out of date browser. It may not display this or other websites correctly.
You should upgrade or use an alternative browser.
You should upgrade or use an alternative browser.
Mike's Flintknapping, Blacksmithing, & Primitive Crafts
- Thread starter Blade-meister
- Start date
Are they back on the kangaroo? Wolf in kangaroo’s clothing maybe?
Actually, you are not going to believe this but long story short the order is cancelled so I had to return all the traded items to the customer minus the sold one which we agreed was a peace offering to me for cancelling the order after agreeing to all the terms and putting down a deposit. The customer and I worked it out so that we could do business in the future but he wanted his kangaroo hides back so that was that.
Wow, those tomahawks are stunning.
Thanks. I know you know your woods so try aqua fortis sometime on figured maple and you won't be sorry with the results.
That's disappointing but at least you were able to work it out so future business is possible.Actually, you are not going to believe this but long story short the order is cancelled so I had to return all the traded items to the customer minus the sold one which we agreed was a peace offering to me for cancelling the order after agreeing to all the terms and putting down a deposit. The customer and I worked it out so that we could do business in the future but he wanted his kangaroo hides back so that was that.

Lol I had looked it up as soon as I saw the effect it had on the curly maple handles. I'm about to pull the trigger on some, to have on hand when I'm able to get back to the lathe. Thanks for the tip! I'm always looking for ways to enhance the look of woodgrain or figuring. I really like the look pure tung oil imparts, but it is kind of a pain waiting for it to dry enough to put a finish on.Thanks. I know you know your woods so try aqua fortis sometime on figured maple and you won't be sorry with the results.
Lol I had looked it up as soon as I saw the effect it had on the curly maple handles. I'm about to pull the trigger on some, to have on hand when I'm able to get back to the lathe. Thanks for the tip! I'm always looking for ways to enhance the look of woodgrain or figuring. I really like the look pure tung oil imparts, but it is kind of a pain waiting for it to dry enough to put a finish on.
The nitric acid is nasty that's in it so you'll want to do it outside or wear breathing protection. Applying the heat gun is the key. At first the wood turns a sickly green and you think you've made a big mistake, but keep the heat gun on it and it will start to turn redish brown in no time. It does raise the grain so I hit it with 0000 steel wool in between applications. Raising the grain before application does help. Get some and add it to your bag of magic tricks for sure!
Awesome
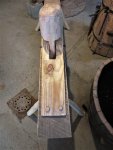
A large part of what I do involves making handles for things like axes, tomahawks, blacksmith hammers, knives, etc..... There's a right way to do it and a wrong way to do it with traditional tools like a draw knife and spoke shave. The wrong way is to stick it in a vise or try to clamp it down/pin it against something. I've done all those and above and it just feels like you are fighting the wood. The right way is to use a shave horse. The "dumbhead" piece pins the working piece down to the shelf so that you can easily shave the wood down to the size and shape you need. With the right tools it's faster than using a belt sander or file. Below is the shave horse I just finished building last week. It's a copy of an old one I found a picture of. You just step on the pedal and that provides the pressure to hold the work piece to the shelf. Work smarter not harder! I plan to antique it a bit and put a finish on it so it fits in with the other old tools. Not a single nail or screw was used to make it and I used old tools like a broad hatched and draw knife which date to the mid to late 1800's.

All the parts to the shave horse were either from a cabinet maker's junk pile or harvested from my land. The legs are wedged and wooden pegs were carved from saplings to serve as connectors.

Notice the wooden pegs carved to hold the angled work shelf. It was quite an affair to get them to fit snugly without splitting the oak bench. A shave horse would have made making the pegs much easier....but you have to make a shave horse first!

Wedged sapling legs. Finding saplings that curved the same way was a bit of a challenge, but when you have a woods to search it's not hard to find the right one eventually.

The antique I based my design on had this shelf on it. I wasn't sure what it was there for until I rested my favorite draw knife on it. This draw knife was forged from an old file by a blacksmith in the 1800's most likely. After I cleaned it up, oiled it, and sharpened/honed it, it cut very, very well. File steel holds an excellent edge and many knives are forged from old worn out files
All the parts to the shave horse were either from a cabinet maker's junk pile or harvested from my land. The legs are wedged and wooden pegs were carved from saplings to serve as connectors.
Notice the wooden pegs carved to hold the angled work shelf. It was quite an affair to get them to fit snugly without splitting the oak bench. A shave horse would have made making the pegs much easier....but you have to make a shave horse first!
Wedged sapling legs. Finding saplings that curved the same way was a bit of a challenge, but when you have a woods to search it's not hard to find the right one eventually.
The antique I based my design on had this shelf on it. I wasn't sure what it was there for until I rested my favorite draw knife on it. This draw knife was forged from an old file by a blacksmith in the 1800's most likely. After I cleaned it up, oiled it, and sharpened/honed it, it cut very, very well. File steel holds an excellent edge and many knives are forged from old worn out files
Attachments
I'm sure John's was better than mine. I watch his channel off and on with Old Hickory Forge and Christ Centered Ironworks. I used to love Chandler Dickinson's channel too, but he doesn't post videos much anymore. Still too cold for me to fire up the forge. I woke up to several inches of snow this morning. My anvil is indoors, but I still have to roll the forge outdoors to forge.Saw one of these at Black Bear Forge.
bluesman
Shave Enthusiast
I've been down to John's shop for demos three times now. Well over 120 miles I'm sure, but always worth it. He is a very active member of Rocky Mountain Smiths. As far as his shave horse being better, I don't know. It seems that these simple tools are all about functionality. I seem to remember his being built on a bit of an incline.
By the way I did stop in to Folsom NM. in February, but the museum was closed for the season. It appeared that the archaeological find was not the thrust of the museum. After researching a little on the web I learned that Folsom was a booming cattle drive town before being destroyed by a flash flood. Someone surveying the damage from the flood made the archaeological find that was exposed by the flood.
By the way I did stop in to Folsom NM. in February, but the museum was closed for the season. It appeared that the archaeological find was not the thrust of the museum. After researching a little on the web I learned that Folsom was a booming cattle drive town before being destroyed by a flash flood. Someone surveying the damage from the flood made the archaeological find that was exposed by the flood.
I've been down to John's shop for demos three times now. Well over 120 miles I'm sure, but always worth it. He is a very active member of Rocky Mountain Smiths. As far as his shave horse being better, I don't know. It seems that these simple tools are all about functionality. I seem to remember his being built on a bit of an incline.
By the way I did stop in to Folsom NM. in February, but the museum was closed for the season. It appeared that the archaeological find was not the thrust of the museum. After researching a little on the web I learned that Folsom was a booming cattle drive town before being destroyed by a flash flood. Someone surveying the damage from the flood made the archaeological find that was exposed by the flood.
Sorry for the slow reply, I was busy this week cutting brush in the afternoons after working and then I was making a hickory handle for the latest axe someone gave me.
That's pretty cool that you've been to John's shop. You'll have to convert him to wet shaving! I've enjoyed his hook of the week ongoing series. I like the way he approaches things and he seems like he takes good care of his tools / organizing them. He certainly has helped my blacksmithing development. I like the fact that John can tackle most anything. It's how I want be someday in regards to my blacksmithing skills. A lot of guys these days are focussed on blades which isn't bad if that's what they enjoy, but for me I want to be able to be one of these guys that can make just about anything from hinges to axes and froes.
Hey..... I resemble that remark.....A lot of guys these days are focussed on blades
I posted pictures in my journal, but thought it might also be appropriate to provide more detail here:
I put this bear claw necklace together and it includes 23 grizzly and black bear claws. The design purposely avoids all the modern clasps and such and captures a primitive tie so as to adjust the tightness to the wearer's liking. I generally don't sell necklaces of this calibur due to the cost of acquiring bear claws like these. I can say, there's quite a few "Benjamins" in bear claws here. With that said, I can take someone's bear claw and make a dandy pewter cap for it to make a very nice necklace. I've made more than my share of arrowhead necklaces as well both of modern points I've made and ones people have sent me that are old.

The leather pouch is a simple example of a mountain man tobacco pouch. I used an old boot's leather to make this guy so I could see how well brass tacks can be clinched on it. Clinching is a technique where the brass tack is pounded through the leather, then bent over and pounded back into the leather. This technique will ensure the brass tack never falls out. Period correct methods call for cutting the tip off the brass tack after pounding through the leather and then peening it over to hold it on. Brain tanned deer leather is used for the neck tie and the toggle loop. Real 1800's Indian beads were used on the toggle loop as well. The toggle button is a deer antler tine.
I also hand hew wood. I made this bench with my daughters as a project we could do together. I used draw knives, axes, hewing broad axes and all traditional wedging of the legs. I intentionally left the hewing marks on the bench top to give it the rustic look it needed. I tend to like amber colored shellac for indoor rustic designs and used it on the bench. The wood is a really hard maple that was from a tree struck by lightening 5 years ago. The legs are from beech saplings I cut on my own property. It's a very sturdy bench that could support two very heavy people if needed. This bench could have fit in really easily with a pioneer log cabin from the 1700's or 1800's. Many of them were made just like this one because folks needed to make simple furniture back in those days.


I put this bear claw necklace together and it includes 23 grizzly and black bear claws. The design purposely avoids all the modern clasps and such and captures a primitive tie so as to adjust the tightness to the wearer's liking. I generally don't sell necklaces of this calibur due to the cost of acquiring bear claws like these. I can say, there's quite a few "Benjamins" in bear claws here. With that said, I can take someone's bear claw and make a dandy pewter cap for it to make a very nice necklace. I've made more than my share of arrowhead necklaces as well both of modern points I've made and ones people have sent me that are old.
The leather pouch is a simple example of a mountain man tobacco pouch. I used an old boot's leather to make this guy so I could see how well brass tacks can be clinched on it. Clinching is a technique where the brass tack is pounded through the leather, then bent over and pounded back into the leather. This technique will ensure the brass tack never falls out. Period correct methods call for cutting the tip off the brass tack after pounding through the leather and then peening it over to hold it on. Brain tanned deer leather is used for the neck tie and the toggle loop. Real 1800's Indian beads were used on the toggle loop as well. The toggle button is a deer antler tine.
I also hand hew wood. I made this bench with my daughters as a project we could do together. I used draw knives, axes, hewing broad axes and all traditional wedging of the legs. I intentionally left the hewing marks on the bench top to give it the rustic look it needed. I tend to like amber colored shellac for indoor rustic designs and used it on the bench. The wood is a really hard maple that was from a tree struck by lightening 5 years ago. The legs are from beech saplings I cut on my own property. It's a very sturdy bench that could support two very heavy people if needed. This bench could have fit in really easily with a pioneer log cabin from the 1700's or 1800's. Many of them were made just like this one because folks needed to make simple furniture back in those days.
This is AWESOME! and the Necklace is out of this world!
This is AWESOME! and the Necklace is out of this world!
Thanks Dave! I've wanted to have a bear claw necklace since watching Dances with Wolves in the theater when I was 18 and saw this dude. Those are some serious grizzly claws.

kf5gtc
Shave Newbie
I make a fair amount of knives each year. Here is one of my favorite knives to make hafted into a deer leg bone with sinew or intestine wrapped around it / my homemade pine pitch glue.
View attachment 10158
The scrimshaw on the bone handle replicates Inuit Indian scrimshaw found on artifacts from their culture. In this case there are atlatl hunters shooting at caribou. The "long" looking multi-headed beast is actually how they depicted multiple caribou running in a herd. I thought that this depiction was quite intelligent in it's simplicity and the action it depicts. I also make this type of knife without the scrimshaw. The flint point is actually Burlington Chert from Missouri flaked in a Hardin style point.
Holy Crap! This is freaking incredible. Something like this with artwork from a tribe in GA or TX would be great for my Cowboy Action Shooting outfit!
Holy Crap! This is freaking incredible. Something like this with artwork from a tribe in GA or TX would be great for my Cowboy Action Shooting outfit!
Sorry about not seeing this email, work has picked up and I haven't been online much lately. Send me a PM if you are interested in a knife. I'm in the process of making 3 of them right now so throwing in another one wouldn't be an issue.