The Shaving Cadre

Welcome to The Shaving Cadre, a forum dedicated to gentlemanly discourse about wet shaving and other topics of common interests. Membership is always free so register today and join in the fun

Help with Restoring a Brush

dangerousdon

"I am Udderly Insufferable”
Veteran
Concierge Emeritus
Okay, so I have this Ruberset brush that I really like the look of and want to get it back to it's old glory. Here is the rub...I have absolutely no idea what I am doing. Check out the pics below and I will discuss after...
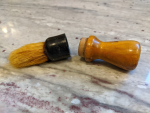
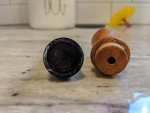
1590672251868.png1590672271453.png1590672286736.png

So I am sure I am going to need to do a little sanding and then some kind of coat. I also realize that I am going to need to take out the knot and replace it. I would like to get the lettering filled in again. The knot is small and if I had to guess...is probably a 20mm...maybe smaller?

Anyway...this is the first time I am attempting to do anything like this and while I am sure I will make a mistake along the way...I would like to minimize as many as I can. So that is why I am asking you all for help. What should I start on first? What are the processes that you all find best for a project like this? Is Chad @Cvargo ever going to stop eating peanut butter while drinking bourbon? These are the question I need answers for!

Any and all advice is much appreciated.

#bourbonandpole
 
As with peanut butter and bourbon or peanut butter and Oreos... When doing a brush restore just jump headfirst into the pool and it will turn out great because you did it.

#BourbonandPole
 
Okay, so I have this Ruberset brush that I really like the look of and want to get it back to it's old glory. Here is the rub...I have absolutely no idea what I am doing. Check out the pics below and I will discuss after...
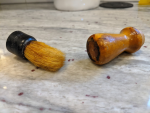
View attachment 25279View attachment 25280View attachment 25281

So I am sure I am going to need to do a little sanding and then some kind of coat. I also realize that I am going to need to take out the knot and replace it. I would like to get the lettering filled in again. The knot is small and if I had to guess...is probably a 20mm...maybe smaller?

Anyway...this is the first time I am attempting to do anything like this and while I am sure I will make a mistake along the way...I would like to minimize as many as I can. So that is why I am asking you all for help. What should I start on first? What are the processes that you all find best for a project like this? Is Chad @Cvargo ever going to stop eating peanut butter while drinking bourbon? These are the question I need answers for!

Any and all advice is much appreciated.

#bourbonandpole
easiest place to start is probably the wood part. just sand it by hand until you are happy with it and it's smooth(i'd probably start at 200 grit unless there are some major issues you need to address). for a new finish, wipe on poly is pretty easy to apply and will seal and protect pretty well.

for the knot, try and cut the bristles off flush with the top if you can, then carefully (maybe from the underside since that isn't being supported) drill out the plug with the largest drill bit you can comfortably use while leaving yourself a margin for error. after that you can chip and carve the rest out by hand, then sand/clean up the ferrule. there are several ways to set the new knot and reattach the ferrule as far as adhesives go just make sure you have your plan before you start and make sure you get a good measurement fore the hole before ordering a new knot.

That is probably how i would go about it at least. looking forward to the progress updates.

#bourbonandpole
Thanks Kyle! I know this is simple work for you...but I'm not all that handy. The helps immensely. I'll try to update when I can!
 
When working on the ferrule, wrap the outside with a few layers of masking tape, or a layer of masking then a layer of duct tape. In case your drill or tools slip, this can prevent them from marring it.
 
When working on the ferrule, wrap the outside with a few layers of masking tape, or a layer of masking then a layer of duct tape. In case your drill or tools slip, this can prevent them from marring it.
Great Idea! Thanks!
 
Back
Top