The Shaving Cadre

Welcome to The Shaving Cadre, a forum dedicated to gentlemanly discourse about wet shaving and other topics of common interests. Membership is always free so register today and join in the fun

Gibbs Adjustables and their offspring

Clouds

Shave Member
Lets talk Gibbs Adjustables and the razors that are based on them here.

This is just my humble opinion - at this point in time it is the best shaving adjustable DE razor that you can get. The issues/problems with them are:
1 - The Notch
2 - Its head heavy

On the notch.
Frank - just cuts the tabs and then lines up. Yes I have done this - only once.
With my ageing eyes, I need a magnifying glass to do the lining up and long term that does not suit me, so I needed a different solution.

I'm on the other end of the world to most of you and getting the punch was going to take too much time to get here, so I have made various things that put the notch in the blade. I now have a notcher that is fast and accurate. I'll address it in a later post in this thread.


Its head heavy - Brass handle, pick your length and problem is solved.
Personally, I have been up to either 105mm or 110mm and come back down to somewhere around 75mm which is standard.
The current handle on my Gibbs is a 75mm but has a Gillette inspired bell bottom - looks cool and also shifts the balance slightly further down.

I have 4 Gibbs adjustable razors - a 15, 17 and an un-numbered. These are all the same and the parts all interchange. Even the dial adjuster "clocks" the same on all three.

My fourth is the Aluminium version, which I believe only came numbered as a 15. This does not benefit from a heavier handle and also is not as smooth as the chrome/brass versions, again just my opinion.

The Personna Precision Micrometric
Also head heavy but no modifying blades.
On mine, its current brass handle is a 75mm - again with a fancy "heavier" bottom. I have a handle that I matched the length to my Rex, but I kept coming back to the 75mm.
Its "smoothness" is about the same as the Aluminium version

The Rex.
My version is a "M" version. In build quality - its the best of my current lot.
It is also the least smooth of the lot. You can get around some of it with different soaps. They say that the later versions are smoother, but I can't comment on that.
 
@Clouds and @Dragonsbeard - be sure to post your findings here. I'm guessing that the Taiga may be the way to go rather than the Heritage if I'm looking for a Gibbs replacement/supplement.

We will. I've brought the discussion to a main board rather than in an introductory thread.
From all reported accounts, the Taiga is a worthy replacement.

I'm going to wait to try the Heritage before making a strong decision since the Taiga is out of stock but based on the fact that the Taiga is all SS it may be the one to have but if the Heritage is only $100 then that would be almost a 3rd less if you opt for the Ti handle option on the Taiga. Of course you get two baseplates and the first ever adjustable to offer an OC baseplate.

The last post on the Heritage was that the handle was turning with the Adjustment dial. Its an easy fix if that piece is machined. If its moulded, that's another story. I am watching with interest.
 
Gibbs with "Bell" handle
fff2efd40230b391fe8b0a52d4eae687.jpg
Personna Adjustable with brass handle
c975e40e3aa8afd0ddb6445596e70047.jpg
 
Thanks for the pics. I'm super curious about the Personna razor now. I've long been a Personna fan, as it was the first blade I fell in love with and is still my favorite. I've been chasing after Personna razors..... but haven't found many, and have never heard of this one until now. I need to find one!
 
Thanks for the pics. I'm super curious about the Personna razor now. I've long been a Personna fan, as it was the first blade I fell in love with and is still my favorite. I've been chasing after Personna razors..... but haven't found many, and have never heard of this one until now. I need to find one!

They come up from time to time on Ebay.
This one had a bump on one of the bars and also a broken handle. The bump didn't affect the shave but irritated me a little and I have got rid of most of it with some light tapping and sandpaper.
I guess that the broken handle scared people away as I was the only bidder on it. That of course suited me perfectly.
 
Those are great looking handles, can you say where you got them? My Gibbs really needs a replacement handle.

Since you seem to know these razors, have you seen one that doesn't dial all the way down to 1?

I'm really interested in your notching solution, I've got the punch, and am using a vintage Gibbs blade to trace the notch, but still having a lot of fails. Either a bit off center or the blade just snaps on one side.
 
By far the best adjustable out there and I have tried several over the years but you identified the limiting issues (blade notches and very head heavy). The hole punch works beautifully and doesn't take too much time as in seconds to modify one's favorite blade. Your (Clouds) custom longer brass extension really helps the razor's balance and maneuverability - I use the 90 mm version with great success. Only this new Taiga (russian adjustable) is comparable and possibly better as it's entirely stainless or SS with Titanium (partial) handle and takes regular DE blades without modification necessary. The Taiga can also be more efficient when it's gap is wide open while still being a smooth tool. It also has an open comb option which some may appreciate. However if you can find a Gibbs (try French eBay) you will not be dissapointed.
 
Those are great looking handles, can you say where you got them? My Gibbs really needs a replacement handle.

Since you seem to know these razors, have you seen one that doesn't dial all the way down to 1?

I'm really interested in your notching solution, I've got the punch, and am using a vintage Gibbs blade to trace the notch, but still having a lot of fails. Either a bit off center or the blade just snaps on one side.

@Clouds makes the handles. I ordered one from him and I'll be picking it up at the post office this afternoon.
 
By far the best adjustable out there and I have tried several over the years but you identified the limiting issues (blade notches and very head heavy). The hole punch works beautifully and doesn't take too much time as in seconds to modify one's favorite blade. Your (Clouds) custom longer brass extension really helps the razor's balance and maneuverability - I use the 90 mm version with great success. Only this new Taiga (russian adjustable) is comparable and possibly better as it's entirely stainless or SS with Titanium (partial) handle and takes regular DE blades without modification necessary. The Taiga can also be more efficient when it's gap is wide open while still being a smooth tool. It also has an open comb option which some may appreciate. However if you can find a Gibbs (try French eBay) you will not be dissapointed.

I both love and hate hearing these review on the Tiaga. I'm going to have to start saving my pennies...
 
A couple years ago I tried a Gibbs and a Rex. Loved the Gibbs but due to the price, I put it out of my mind. This thread isn't helping (but I love it. Thanks @Clouds )

Keep searching Ebay. The only reason that I bought the third brass one is that I found it as a "Buy Now" for $30 - so they do come up.

Those are great looking handles, can you say where you got them? My Gibbs really needs a replacement handle.

Since you seem to know these razors, have you seen one that doesn't dial all the way down to 1?

I'm really interested in your notching solution, I've got the punch, and am using a vintage Gibbs blade to trace the notch, but still having a lot of fails. Either a bit off center or the blade just snaps on one side.

Some of them don't dial down to 1. What has happened there is that the piece with the thread has rotated slightly and you need to rotate it back.
I made the below clamp to do it. You tighten the clamp and rotate the top piece back. This is a piece of scrap nylon that I split, inserted a piece of cardboard between the two halves and drilled an 8mm hole into. All the nylon clamp does is not damage the thread while holding it.
The one that I got for $30 (mentioned above) stopped at 2.

Gibbs Adjuster.jpg

I'll post the Notching solution tomorrow for you
 
@Clouds thanks for that, ah of course it's that simple. I feel like a dolt now. I'll try to jury rig a fix, but at least I know that it's not really affecting anything now.

I'll be in touch in a couple of weeks about a handle as well.

Looking forward to seeing your notching jig, I was just thinking there has to be a better way this morning.
 
By far the best adjustable out there and I have tried several over the years but you identified the limiting issues (blade notches and very head heavy). The hole punch works beautifully and doesn't take too much time as in seconds to modify one's favorite blade. Your (Clouds) custom longer brass extension really helps the razor's balance and maneuverability - I use the 90 mm version with great success. Only this new Taiga (russian adjustable) is comparable and possibly better as it's entirely stainless or SS with Titanium (partial) handle and takes regular DE blades without modification necessary. The Taiga can also be more efficient when it's gap is wide open while still being a smooth tool. It also has an open comb option which some may appreciate. However if you can find a Gibbs (try French eBay) you will not be dissapointed.
Patiently waiting my turn with the Taiga pass around and thinking I better start saving my pennies now after reading this comparison.........
 
When I bought my first Gibbs, I read about the punch and the cutting of the tabs but neither were a satisfactory solution for me. The first jig that I made was more of a template than a jig and I used a Dremel to cut the slots. It worked fine but you needed to be careful using it because the Dremel, besides cutting the blades could also cut the jig.

I then made one on a milling machine, where I slit a piece of metal and used a pin to punch the notch. It works well but not everyone has access to a milling machine and I still wanted to design something that could be made with some basic tools.

This is what I came up with. It also served as a proof of concept for what I ultimately had in mind.
(It has been posted on another English forum and was translated and posted on the French forum)


You are going to need:

A piece of sandpaper

A 3mm Drill bit that you are going to sacrifice. The 3mm drill shown here has been sharpened a lot. If you have a piece of round 3mm tool steel, which of course a drill is - use that.

2 x nuts and bolts

A drill to match the two bolts (I used a 5mm here)

A strip of aluminium from a beverage can

Two pieces of metal

Marking pen or scribe (Something to mark the aluminium can)

Scissors or trimming knife/box cutter
(These scissors are too big as you will see later)

Hand drill (although I have a milling machine, I wanted to make this out of basic tools)

Not Shown:
Trimming knife / Box cutter
The two nuts and bolts
Scribe

Optional:
A Clamp (I didn't use one because again I wanted to use basic tools)
GibbsJig01.jpg
GibbsJib02.jpg
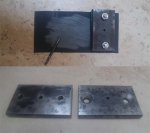
Drill the three holes.

The two outer ones to match the nuts and bolts that you have. They must be wide enough apart to clear a blade so anything more than about 30mm will work. The 3mm hole somewhere close to the middle

If you have a clamp use it here to clamp the two pieces of metal together before you drill them. I didn't and my two pieces don't line up exactly. If you look carefully at the top of the image you can see this.

I then sandpapered the top end of the 3mm drill bit so that it was flat and snapped it off. Effectively it's going to work like a scissors. If you have access to a Dremel (or similar) rather cut off the excess of the 3mm drill bit. The fact that I snapped it created a problem which I mention later.

While I was doing sandpapering, I also cleaned to the two pieces of metal.

You want to end up with something like the two pieces in the bottom half of the image. The countersinking is optional. I counter sunk the two outer holes because that matched the two bolts that I was using.

Up to now the only mistake that you can make is that the two outer holes are not far enough away from the middle hole and that they interfere with the blade edges when you insert the blade.
The second part of the jig
This is what determines how accurately the notch is done so you do need to be careful

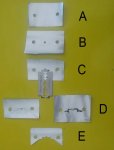
Cut a suitable size strip from the aluminium can.

A - Mark and punch the two outer holes. I used a paper hole punch to do punch these holes.

Assemble the jig, sandwiching the piece of aluminium strip between the two steel plates.

B - Punch the middle hole using the flattened (snapped) drill bit - At this point I found out that my drill was slightly bent from breaking it. It worked fine but I had to pull it out with a pair of pliers - so I suggest that you cut it with a Dremel if you can.

I wasn't going to snap another drill bit so I used the pin that I already had and punched the rest of the small holes in the image.

C- If you have an old Gibbs blade use that, otherwise you are going to have to do some careful measuring. I took a blade that I already punched and marked the aluminium out using that.

D - The Marking pen works fine but I found that scribing it was better.

E - Cut where you need to. Also cut off the excess so that there is no aluminium sticking out. You want to end up with the aluminium similar to this. I have no aluminium that touches the sharp edges of the blade.

This is going to determine both the depth and the centering of the notch. It was at this point that I found that the scissors were way too big, so I ended up using the ones on my Leatherman. The aluminium strip is soft and cuts easily.

On the second "notcher" I used a box cutter/trimming knife to cut the aluminium and frankly this is the best thing to use.

This part needs to be accurate as it is what does the alignment. The great part is that if you make a mistake, just cut another strip from the can and start again. On the second notcher the can that I got was not thick enough so I just used two strips.

Now it’s time to re-assemble everything.
When you do, put the pin so the aluminium lines up and then tighten everything up

GibbsJig04.jpg
GibbsJig06.jpg
To use:
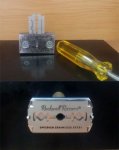
Slide the blade into the jig.

Lay the jig down flat.

Insert the pin and give it a smart tap. Repeat for the other side. I used the screwdriver in the image to tap it.

The top of the image shows one side done and the blade inserted before doing the other side.

Does it work - absolutely perfectly, all the time every time. Its also fairly quick to use.

See the bottom part of the image. The blade is perfectly lined up in my Gibbs.


I have since milled the edges so that the corners are all square just to have it neat and tidy, but is not necessary.


This is where I wanted to end up. I saw that my idea worked fine so all I really did was build a pin/spring arrangement on top.
I also wanted to be able to use it in a reloading press, hence the thread and the little piece on the left hand side. Using it in a reloading press is extremely fast although I suspect that it won't get much use this way.

This was done using a lathe and a milling machine. Left part of the pic shows the components (I forgot to put the white handle in the pic) and the other side shows it in use. Insert blade, smack the white handle, turn blade around and smack the white handle again.

I bought, the bolt and the two pins. I have no idea where the spring came from, I have a packet of springs that have come out of "things" over the years and its was among them. It needs to be fairly strong.
I built it over two evenings.

Is it Overkill - absolutely
Was it fun to build - absolutely.
Is it Quick to use - absolutely


Gibbs Notcher.jpg

Any questions, I will do my best to answer - otherwise Happy Building Gents!!
 
Wow! A+++ for creativity and inventiveness! Very kind of you to share!

Thanks - happy to share

Very nice! I’ve got a metal punch but think I can adapt the idea to it.

Thanks again.
I didn't have the punch so I had to make one. You already have a metal punch, you are halfway there.
Show us what you come up with.

Its a matter of thinking out of the box.
Before I came up with the idea of using an aluminium beverage can for the spacer, I was going to use shim-stock. The shop wanted to sell me a box of it which I didn't need.
 
Back
Top